Frequently asked questions
LEARN HOW TO SET UP EMAIL ACCOUNTS, THE IMPORTANCE OF SSL CERTIFICATEOR EVEN TRANSFER A DOMAIN
We are all aware of the importance of a website for a company's online strategy.
Almost every business, Business to Business or Business to Consumer, needs an online presence to reach consumers in the Internet Age.
A company must have an online store , an online portfolio , a blog , and be present on social media . It will therefore need to have a way of being close and having a close relationship with its customers.
Even if you are present on social media, “being online” without having a website doesn’t make much sense. However, having a website is not enough to get good results; you need to be able to turn it into an Inbound Marketing machine .
HOW TO OPTIMIZE SEARCH ENGINES TO APPEAR IN SEARCHES?
Today, everything is very fast and interactive . For all these reasons, a website cannot operate alone, and therefore, it is essential to consider detailed descriptions, multimedia content, integration of social networks, blogs and partners and a range of other tools, integrated into the website itself.
SEO - Search Engine Optimization is a " must have " and when we say "must have" we have to mean it, because it is truly essential for any website, but it requires a lot of work, consistency, ambition, and more ambition, because even when it doesn't seem like there will be results, suddenly we achieve our goals, a good position for influential words in search engines and, respectively, sales results. It is essential to always have the website/store optimized in terms of technical parameters and with good content.
BACKLINKS, WHAT ARE THEY?
SEO is related to building backlinks ( inbound links ). Its goal is to ensure that other quality websites link to our website , and even better, using the right keywords . The more backlinks you have, the more important your website is considered by search engines and, consequently, it can possibly rank higher.
But that’s not all…
Creating quality , educational , entertaining and engaging content is very important. If people like the content, be it an article, a product, etc., it will create such an engagement that they will want to share it and thus recreate a connection through sharing.
PAGE OPTIMIZATION
SEO is extremely important, but we must not forget that it basically consists of placing the most important keywords , previously identified, in the content of the page in the appropriate elements. These elements on the page are the titles, subtitles, page body, image tags and links (URLs) .
Choosing a main keyword for each page/product is very important. Focus on optimizing that page for that keyword/phrase. If the page has too many keywords, it will lose importance and authority, as search engines will not be able to decipher exactly what the page is about. This is very common on homepages, where many keywords are used. Include the main keywords in the title and subtitle . These areas of content carry a lot of weight in search engines.
Include your keywords in the body of your page, but don't take them out of context. Make sure they're relevant to the rest of your content.
Include keywords in the image filenames that are descriptive (e.g. keywords.jpg) and in the Alt Image tag. Put the keywords in the page URL and keep the URL clear and obviously meaningful.
Bold and Italics
Google tries to display in its results the pages that are most relevant to the keywords searched for. One of the ways Google identifies the relevance of a page is the presence of bold text and, to some extent, italics . Since these texts appear prominently on the page, they are a strong indication that the subject of the page is related to its content. Try to bold the keyword used on the page at least once.
Prepare content with your audience in mind, but also optimize it for search.
TITLE TAG & META TAGS
A Meta Tag is a line of code that is inserted into a page . Search engines look at Meta Tags to learn more about what the page is about.
Meta Tags continue to play an important role in SEO strategy. Make sure you are using them on every page and that they are ALL different.
The most relevant ones are:
Title - not really a meta tag but it is one of the most important attributes to define on a page. It describes what the page is about.
Meta Description - defines the description displayed in search engine results. It must be described in a way that stimulates people's interest in wanting to know more about the content of the page, in order to increase the probability of clicking on the link to your website (CTR - Click-through rate).
Meta Keywords - normally 10 sets of words are chosen that best define the inserted content.
USE OF IMAGES
Marketing Experiments ran a test comparing stock images with real photographs used on a website to see what the effect was on lead generation. They found that images of real people performed 95% worse than agency images.
This is because the latter tend to be irrelevant. Resist the temptation to use photos of forced smiles of business people! Try to use images (that do not have titles or phrases, as this information is not absorbed by search engines) where your visitors can see themselves , sending a message to your audience 's subconscious .
With phishing attacks and identity theft on the rise, the security demands of your website visitors and customers are ever greater. SSL certificates – the security technology that activates the yellow padlock and green bar – are an essential service for all websites that conduct online transactions or require data from visitors or customers.
It is a fact that businesses that use SSL certificates gain more traffic and increase sales of their products or services. Additionally, the GlobalSign EV SSL certificate offers a unique opportunity to differentiate yourself from the competition: if your address displays a green bar in the browser next to your company name, this will further strengthen trust in your website and give you a significant advantage over your competitors.
Google even released an official statement saying that starting in January 2017, the Chrome browser will display a warning to users who are using non-secure pages (HTTP) to include passwords or other sensitive data. The browser indicates some sites as “secure” by showing a padlock next to the address that begins with the letter “s”.
LEARN HOW TO ADD AN EMAIL ACCOUNT IN OUTLOOK
Although most people add an email account when they first run Outlook, you can add your primary or additional email accounts at any time.
(In addition to our guide, you can also watch this video How to manually add an email account which teaches you how to create an account step by step.)
1. Click the Files tab.
2. Under Account Settings , click Add Account .
3. Enter your name, email address, and password, and click Next .
A progress indicator appears while your account is set up. The setup process may take a few minutes.
If the initial attempt to set up your account fails, a second attempt can be made using an unencrypted connection to the mail server. If you see this message, click Next to continue. If the unencrypted connection also fails, your email account cannot be set up automatically.
Click Retry or select the Manually configure server settings check box.
In case of setting manually:
1. Click Internet E-mail , and then click Next .
2. Under User Information , do the following:
a. In the Name box, type your name as you want it to appear to others.
b. In the Email Address box, type the full email address assigned to you by your email administrator or lSP. Include the user name, the @ symbol, and the domain name, for example, example@fullscreen.pt .
c. In the Password and Confirm Password boxes, type the password that you created or that was assigned to you.
3. Under Server Information , do the following:
a. In the Account Type list, choose POP3 (download emails to your PC) or IMAP (read emails on the server, without downloading them to your PC).
b. In the Incoming mail server box, type the full server name provided by your ISP or email administrator. This is often mail followed by the domain name, for example, mail.fullscreen.pt .
c. In the Outgoing mail server (SMTP) box, type the full server name provided by your ISP or email administrator. This is often mail followed by the domain name, for example, mail.fullscreen.pt .
4. Under Login Information , do the following:
a. In the User name box, type your full email address, such as example@fullscreen.pt .
b. In the Password box, type the password that you created or that was provided to you by your ISP or email administrator.
c. Check the Remember password checkbox
5. Your email account may require one or more of the following additional settings. Contact your ISP if you have questions about which settings to use for your email account.
6. SMTP Authentication: Click More Settings . On the Outgoing tab, select the My outgoing server (SMTP) requires authentication check box.
7. Click Next .
By default, the Test Account Settings by clicking the Next button check box is selected. This option verifies that your account is working. If there is any incorrect or missing information, such as your password, you will be prompted to provide or correct it.
8. Click Finish .
1. Click the File tab.
2. Under Account Information , click Account Settings , and then click Account Settings .
3. Select the email account you want to remove, and then click Remove .
4. To confirm account removal, click Yes .
To remove an email account from a different profile, exit and restart Outlook with the other profile, and then follow the previous steps. You can also remove accounts from other profiles by doing the following:
1. Exit Outlook.
2. In Control Panel, click once or twice on Mail .
Where is Email in Control Panel?
The Mail option appears in different locations in Control Panel, depending on the version of the Microsoft Windows operating system, the Control Panel view that you select, and whether the installed version of the operating system or Outlook 2010 is 32-bit or 64-bit.
The easiest way to find Mail is to open the Control Panel in Windows and in the Search box at the top of the window, type Mail . In the Windows XP Control Panel, type Mail in the Address box.
NOTE: The Mail icon appears after Outlook is started for the first time.
The title bar of the Configure Email dialog box contains the name of the current profile. To select a different profile that already exists, click Show Profiles , select the profile name, and then click Properties .
1. Click Email Accounts .
2. Select the account, and then click Remove .
3. To confirm account removal, click Yes .
OBSERVATIONS :
- Removing a POP3 or IMAP email account does not delete items that were sent and received using the account. If you are using a POP3 account, you can still use the Outlook Data File (.pst) to work with your items.
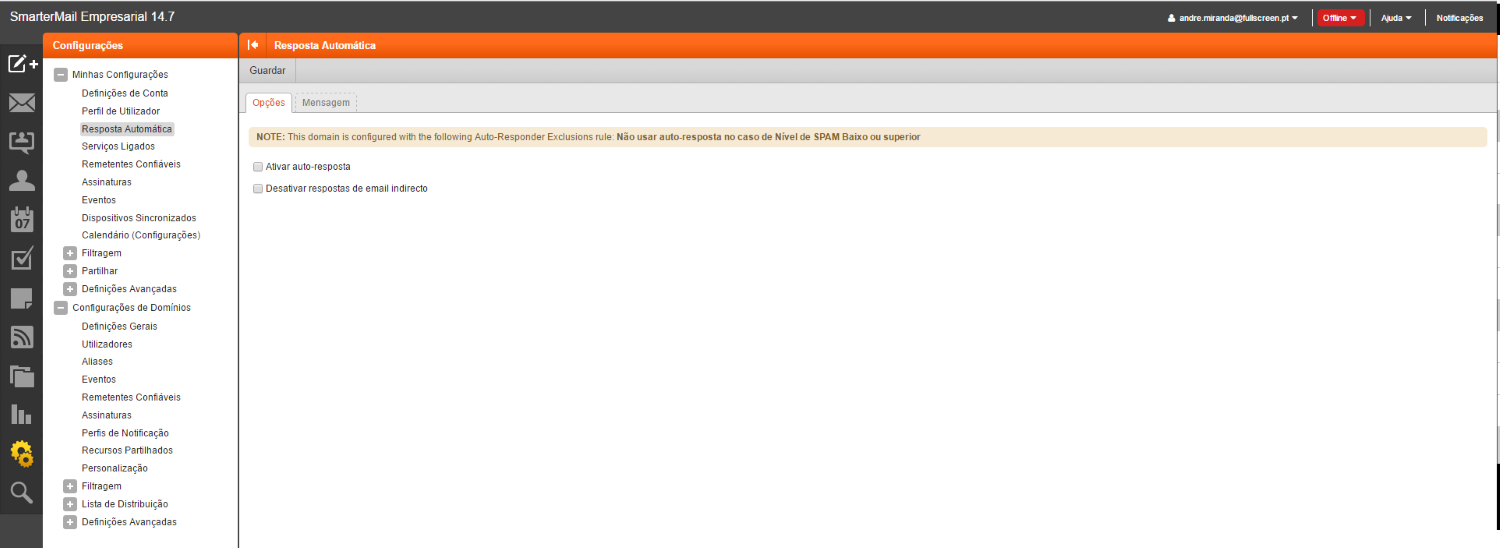
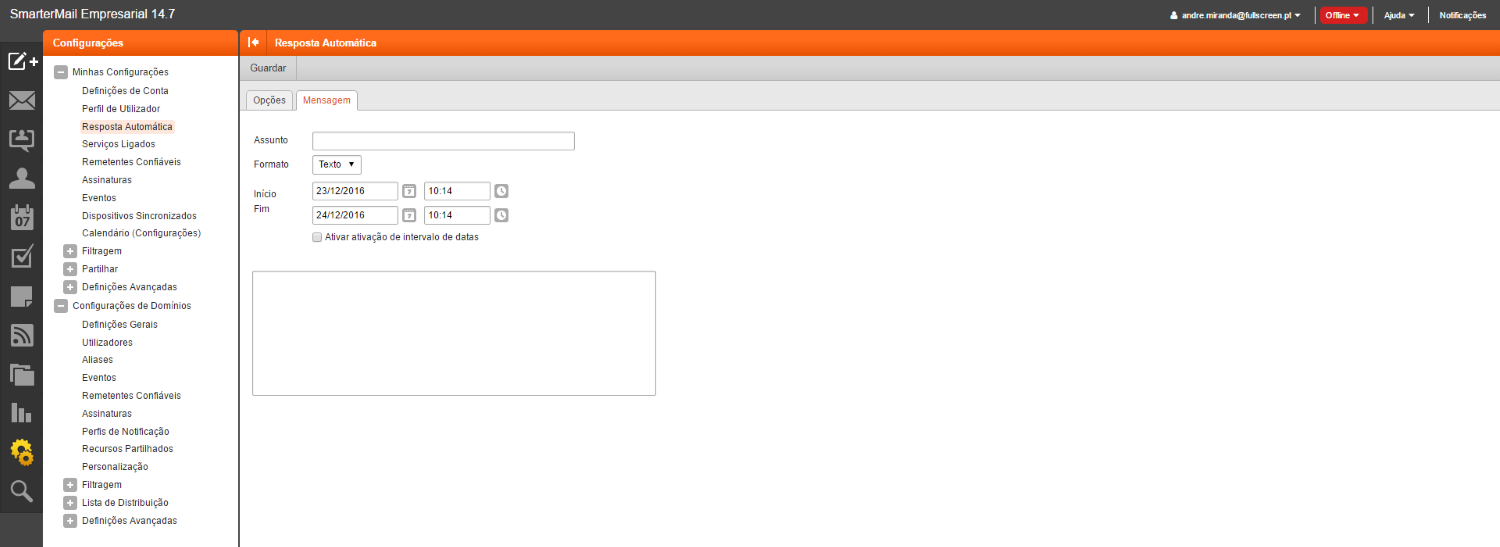
To create the "Automatic Response" simply access the "webmail" and carry out the following steps:
1. Click on settings
2. Select the "Automatic Reply" option and check "Activate auto-reply", this way the message window becomes available for editing.
3. Now you just have to write the message, set the start and end date of the automatic response and save.
When a message is considered Spam it is because that message, the sender or the sender's server have serious problems.
When an email is classified as Spam the Mail server, depending on the severity, does one of two things:
- move the message to the "Spam" folder;
or
- delete the message.
There are naturally situations where we do not want a sender's messages to run the risk of being classified as Spam.
In these cases, we can instruct the server to ignore any problems with senders we trust.
Manually add email addresses to Safe Senders:
- Log into Webmail and go to Settings -> [My Settings] -> Safe Senders;
- Click the "Create" button -> Type the email address or domain you trust -> click Save.
Automatically add an email address to Safe Senders:
A sender is automatically added to "Safe Senders" when they indicate that a message is not Spam.
An email is considered Spam when the message, the sender, or the sender's server have serious problems.
When an email is classified as Spam the Mail server, depending on the severity, takes one of two actions:
- move the message to the "Spam" folder;
or
- delete the message.
Users using POP3 may prefer another type of action for messages considered Spam.
Whether you are using POP3 or for another reason, you can change the behavior of the Anti-Spam filters as follows :
- Log into Webmail and go to Settings -> [My Settings] -> [Filtering] -> Spam Filtering;
- In the "Options" tab, choose the option "Override spam settings for this account";
- In the "Actions" tab, choose the desired action for each type of Spam (we recommend that you choose "Delete Message" for messages with a medium or high probability of being Spam).
Communications with the email server can be encrypted, reinforcing security and ensuring the privacy of communications.
To connect in an encrypted manner, make sure you use the correct ports according to the protocol you choose in your mail client configuration:
1 - On the mail receiving server (POP3 or IMAP) and on the mail sending server (SMTP) enter the address [number].myhost.net indicated in your Hosting Technical Sheet;
2 - Use a mail client that supports STARTTLS (recommended) or SSL/TLS (such as Outlook, EM Client, Mailspring, among others);
3 - In the Security/Advanced settings, choose STARTTLS (recommended) or SSL/TLS encrypted connection;
4 - Confirm that your software is using one of the ports indicated below:
If you chose STARTTLS (recommended):Receiving Server:
IMAP - port 143
or
POP3 - port 110
Sending Server:
SMTP - port 587
If you chose SSL/TLS :
Receiving Server:
IMAP - port 993
or
POP3 - port 995
Sending Server:
SMTP - port 465
Follow these steps to create an IMAP connection for your iPhone or iPhone 3G with Firmware 2.0.x:
On your iPhone, select Settings .
1. Then go to Mail, Contacts, Calendars .
2. Select Add Account .
3. Choose Other .
4. Click Add Mail Account .
5. Fill in the Name, Address (full email) and Password fields.
6. Click Next .
7. Confirm that IMAP is selected.
8. Enter the data for the incoming mail server: "Host Name" is mail.fullscreen.pt ; "Username" is your full email address ; "Password" is the same as the one you use to access via webmail / POP3 / IMAP / SMTP
9. Enter the outgoing mail server data: "Host Name" is mail.fullscreen.pt ; "Username" is your full email address ; "Password" is the same one you use to access via webmail / POP3 / IMAP / SMTP
10. Then Save.
11. Your iPhone will attempt to establish an SSL connection to the IMAP and SMTP servers. If it fails, you will see the "Do you want to try setting up the account without SSL?" dialog box; select No . Click Save . When asked "This account may not be able to send or receive email.
12. Are you sure you want to save?" Choose Save .
13. Click on the account you just added (identified by your email address)
14. Scroll down and select the SMTP button.
15. Select the server you just added, identified by the Host Name in step 9.
16. Select OFF for Use SSL.
17. Select Password for Authentication
18. Select 587 for Server Port.
19. Click the SMTP button to go back.
20. Click on your email address to go back.
21. Click Advanced .
22. Swipe down to Input Settings.
23. Select OFF to Use SSL.
24. Select Password for Authentication.
25. Select 143 for Server Port.
26. Click on your email address to go back.
27. Click Mail to go back.
28. Click the Home button.
29. Click on Mail App to check your configuration.
1. Click on “Email”.
a) Fill in your email address and click on the “Manual Configuration” button.
2. In the account type, select the “IMAP” option.
a) Enter the account password and select “Next”.
b) In the IMAP Sending/Receiving Server configuration please fill in "mail.fullscreen.pt"
c) “Username” – fill in your full email address (Example: exemplo@.fullscreen.pt);
d) “Password” – enter the password for your email account;
e) “Server” – Enter the email server address (mail.fullscreen.pt);
f) “Port” – leave as default;
g) “Security Type” – If you are using a normal connection (Port: 143) you should keep the “None” option. If you want to use a secure connection (Port: 993) you should use the “SSL/TLS (Accept all certificates)” option;
h) “IMAP path prefix” – You can leave this field empty;
After filling in all the fields, press “Next” to continue the configuration.
Now you will have to enter the data to connect to the SMTP Sending Server:
“Server” – Fill in the same address you filled in the Server field of the IMAP configuration;
“Port” – Indicate Port 25 for a normal connection or port 465 for a secure connection (SSL);
“Security Type” – If you choose a normal connection (Port 25), you should keep the “None” option selected. If you want to use a secure SSL connection (Port 465), you should select the “SSL/TLS (Accept all certificates)” option.
“Require Login” – Check this option to make an authenticated connection to the sending server. All connections require authentication with Username and Password.
“Username” – Fill in this field with your full email address.
“Authentication” – Fill in this field with your email account password.
Now that you have filled in the Email Sending Server Configuration fields, you should click “Next”.
Select the sync options as desired, indicating your sync frequency and notification preferences.
Finally, provide a name for your email account on your mobile phone and the Name that will be displayed as the Sender in all emails you send via your mobile phone.
Now that you have everything set up, you should be able to check and send your emails using your Android Smartphone:
If you have any questions, please do not hesitate to contact us.
To use this tool follow these steps:
Log into Webmail with the details of the email account to which you want to import messages and other items.
Go to Settings -> [Advanced Settings] -> Click on "Mail Migration".
In the new window, select the type of Mail server from which you will import messages and other items. Click the "Next" button.
Choose the type of items you want to import (Email is always available, but other items depend on the mail server you are importing from). Click the "Next" button.
On the next screen, proceed as follows:
choose IMAP from the selection box;
Enter the server address and account details from which you will import messages, in the same way you would if you were setting up a mail client such as Outlook.
Click the "Check Connection" button to confirm that the connection to the server can be made successfully.
Click the "Next" button.
On the last screen, click the "Start" button and wait for the messages to be imported.
Notes:
This process can be time consuming and runs in the background, so you can close this window and come back later by going to Settings -> [Advanced Settings] -> Click on "Mail Migration".
If you choose to confirm later that the process has been completed, the success of the operation will be confirmed if the options to start a new migration appear again.
To transfer a generic domain (.COM, .ORG, .NET and many others), proceed as follows:
1 - CONFIRM THAT YOUR DOMAIN NAME CAN BE TRANSFERRED
There are cases where you cannot transfer a domain to another Registrar. This may happen in the following circumstances:
- Domain is less than 60 days old: If the domain you are trying to transfer was registered less than 60 days ago, the request will be automatically refused by the current Registrar.
- Domain was transferred less than 60 days ago: A Domain name cannot be transferred to another Registrar within 60 days of a previous transfer.
- Domain is in Redemption Grace Period or Pending Delete status: If the domain name is in either of these statuses it cannot be transferred.
2 - DISABLE ALL PROTECTIONS ON YOUR DOMAIN
Please disable any protections that are active in your current Registrar's Control Panel before making the transfer. They will automatically be re-enabled after the transfer.
Make sure that protections commonly referred to as Theft Protection or Lock are not active on your domain. If your domain is in the Locked state or has any other protection active, the domain transfer will fail.
Also, make sure that you do not have any protections in place that are designed to hide or mask the name and email address of the domain owner. These protections may be called Privacy Protection or Private Domain Registration.
3 - GET THE EPP CODE
Known as EPP Code, Authorization Code or Transfer Secret, this code consists of a password assigned by the Registrar when registering the domain. It is an extra security measure to ensure that the domain can only be transferred by its owner.
Typically, your domain's Transfer Secret can be found in the Domain Administration Panel provided by your current Registrar. If you cannot locate it, you should contact your Registrar's support team to obtain it.
4 - Once you have confirmed that your domain meets the conditions for it to be transferred and that you are in possession of the EPP Code, you can send us the code and we will handle the process.
To transfer management of a .PT domain or subdomain, proceed as follows:
1. Log in to www.dns.pt with the domain owner's login details.
2. Confirm in “My Data” that your email is correct.
3. Then go to “My Domains”, click on the domain process number
4. At the end of the “Related Entities” tab, place the mouse over the “Actions” button and click on “Transfer Domain Management”.
5. Wait for the Transfer Password to be displayed on the screen (you will also receive it in your email).
Once you have the Transfer Password, you can change the management of the domain by sending this code to the company you wish to manage it.
The registrant of the domain name must access www.dns.pt online , to their reserved area, with their respective username and password, then access the process form for the domain they wish to transfer, generate the "authorization key" in the "Actions" - "Transfer Domain Management" button, and then provide said authorization key to the new managing entity.
The new managing entity must access www.dns.pt online , to its reserved area, with its username and password, click on the "Domain transfer key" link, and then enter the domain name and the authorization key provided by the registrant. Upon confirming the change, the transfer of domain management will be processed immediately.
Authorization key features:
- is associated with only one domain name;
- can only be used once;
- is valid for 30 days;
- If a new authorization key is generated, the previously generated one will automatically expire.